The moment a spoonful of silky coffee mousse hits your tongue, you just know you’re in for something special. There’s a gentle, creamy chill, a punch of real coffee flavor, and that luscious, cloud-like texture that somehow feels both light and decadent. I can’t count the number of times this coffee mousse recipe has saved dessert hour—especially when I needed a quick but show-stopping treat. You’d think something so elegant would be fussy, but honestly, this is one of the easiest desserts I’ve ever made. Five ingredients, minimal effort, and a payoff that’ll have your friends swooning (and maybe asking for seconds).
I first started whipping up this coffee mousse with whipping cream for impromptu gatherings when I wanted to impress without breaking a sweat. It all began during a sweltering summer when I craved something cold and caffeinated but didn’t want another iced coffee. Little did I know, this dessert would become a staple for birthdays, brunches, and those “just because” evenings after a long week. The secret to its magic? That unbeatable combo of strong coffee and velvety whipping cream, with just a hint of sweetness. And you know what? It’s totally customizable—great for coffee lovers, busy parents, or anyone who wants a no-bake treat that’s as good as it looks.
As someone who’s tested (and eaten) more mousse than I’d care to admit, I can promise this coffee mousse recipe with whipping cream delivers every single time. Whether you’re a seasoned cook or a dessert newbie, this one’s practically fail-proof. Perfect for high-protein diets (thanks to the cream), easy to make ahead, and honestly, it just makes you feel a little fancy without the fuss. So, if you’ve been looking for a coffee mousse recipe easy enough for weeknights but impressive enough for guests, you’re in the right place!
Why You’ll Love This Coffee Mousse Recipe
Every time I make this coffee mousse, I’m reminded of just how much I adore simple, rewarding desserts. There are so many reasons this recipe has become a go-to in my kitchen, and I’m sure it’ll win you over too. Here’s why this coffee mousse recipe with whipping cream stands out from the rest:
- Quick & Easy: You won’t believe it takes just 15 minutes to prep (plus some chill time). It’s perfect for busy weeknights or when you need a last-minute treat.
- Only 5 Ingredients: No specialty shopping trips required—just coffee, whipping cream, sugar, vanilla, and gelatin (or a vegetarian setting agent). You probably have most of these on hand already.
- Perfect for Any Occasion: Whether it’s a fancy dinner party, Sunday brunch, or a late-night snack, this mousse fits right in. I’ve even served it at potlucks and gotten rave reviews.
- Kid and Adult Approved: The coffee flavor is bold but not overpowering, and the sweetness is just right. Even my friends who “don’t do coffee” have gone back for seconds.
- Unbeatable Texture: Thanks to the whipped cream, every bite is impossibly light and smooth, yet it’s rich enough to satisfy a sweet tooth. No dense or heavy mouthfeel here—just pure, dreamy mousse.
What really sets this coffee mousse apart is the technique. Blending the coffee directly into the whipped cream creates a flavor that’s both intense and mellow (sounds odd, but it’s true!). There’s no weird aftertaste—just a clean, satisfying finish. Plus, you can adjust the sweetness or coffee strength to your liking, which is honestly a game-changer. Whether you want a bold espresso hit or a gentle café au lait vibe, you’re in control.
This isn’t just another mousse recipe floating around Pinterest. It’s the result of dozens of tweaks and taste tests in my own kitchen—so you know it’s reliable. And let’s face it, there’s something about serving mousse in pretty glasses that makes any meal feel special. If you’re after a coffee mousse recipe easy enough for beginners but impressive enough for guests, this is the one to beat. Trust me, it’s the kind of dessert that makes you close your eyes after the first spoonful and just sigh with happiness.
What Ingredients You Will Need
This coffee mousse recipe with whipping cream proves you don’t need a long grocery list to make something incredible. With just five simple ingredients, you’ll get bold flavor and that classic, airy texture—no fancy extras needed. Here’s what you’ll need:
- Heavy Whipping Cream (1 cup / 240 mL) – The base of the mousse. Go for the highest quality you can find; I like the local dairy brand best for extra richness. If you’re sensitive to dairy, coconut cream works surprisingly well too.
- Instant Coffee or Espresso Powder (2 tablespoons / 10 g) – For that strong coffee punch. You can use decaf if you want a caffeine-free version. I usually reach for a dark roast instant espresso for maximum flavor.
- Granulated Sugar (1/3 cup / 65 g) – Adds sweetness and helps the mousse set. Feel free to adjust up or down depending on your sweet tooth. For a deeper flavor, brown sugar or coconut sugar can be swapped in (it’s lovely with coconut sugar, honestly).
- Gelatin Powder (1 teaspoon / 4 g) – This helps the mousse hold its shape. If you’re vegetarian, agar-agar powder is a great alternative (use about half the amount and bloom it in water first).
- Pure Vanilla Extract (1 teaspoon / 5 mL) – Rounds out the coffee flavor and adds warmth. If you’re feeling fancy, try vanilla bean paste for those little flecks—so pretty in the mousse!
That’s it—no eggs, no butter, no unpronounceable stabilizers. Each ingredient plays a key role: the cream gives that dreamy texture; coffee brings the flavor; sugar balances any bitterness; gelatin (or agar) ensures the mousse is set, not soupy; and vanilla pulls it all together.
If you want to mix things up, here are a few handy substitutions and tips I’ve learned:
- Dairy-Free: Swap heavy cream for coconut cream. The flavor will be a little different—more tropical, but still delicious.
- Sweetener: You can use powdered erythritol or monk fruit for a low-carb version. Just be sure to taste as you go since these are sweeter than sugar.
- Coffee Strength: For a milder flavor, cut the coffee powder down to 1 tablespoon. Want it bolder? Add another half tablespoon, but don’t overdo it or the mousse might taste bitter.
Don’t stress about tracking down anything exotic—the beauty here is in the simplicity. And if you’re making this for a crowd, just double or triple the recipe; it scales perfectly. When ingredients are this straightforward, you can really taste each one, so use the best you can get your hands on (especially the cream and coffee!).
Equipment Needed
This coffee mousse recipe keeps things simple—no high-tech gadgets necessary. Here’s what you’ll need to whip it up:
- Mixing Bowls: At least one large bowl and a small bowl for blooming the gelatin. Glass or stainless steel work best (they chill quickly, which is a bonus).
- Electric Hand Mixer or Stand Mixer: For whipping the cream. If you’re feeling old-school, a sturdy whisk and some elbow grease will get the job done, but it takes longer.
- Measuring Cups and Spoons: Precision matters, especially for the gelatin and coffee powder. I’ve learned the hard way that “eyeballing” the gelatin can lead to either soup or rubbery mousse—so measure!
- Small Saucepan or Microwave-Safe Dish: For dissolving the gelatin or agar powder. You can use a mug in the microwave if you’re short on time (just heat gently).
- Rubber Spatula: For gently folding everything together. Metal spoons can knock the air out of your whipped cream, so stick to something soft.
- Dessert Glasses or Ramekins: Presentation counts, especially if you’re making this for a crowd. I love using little mason jars or vintage teacups for a cute twist.
No fancy mousse rings or piping bags needed—unless you want to go all out, of course. If you’re on a budget, thrift store glassware works beautifully (and adds a bit of retro charm). Just be sure to chill your mixing bowl and beaters for best results—it makes the cream whip faster and fluffier!
How to Make Coffee Mousse with Whipping Cream
-
Bloom the Gelatin:
In a small bowl, sprinkle 1 teaspoon (4 g) of gelatin powder over 2 tablespoons (30 mL) cold water. Let it sit for 5 minutes. The mixture should swell and look slightly grainy—don’t skip this step! If you’re using agar-agar, follow the same process but use half the amount (1/2 teaspoon), and bloom in hot water for better activation.
-
Dissolve the Gelatin:
Heat the bloomed gelatin in the microwave for about 10 seconds or in a small saucepan over low heat until completely dissolved and clear. Don’t let it boil—overheating can make the setting power weaker. Set aside to cool slightly (you want it warm, not hot).
-
Mix the Coffee:
In another small bowl, stir together 2 tablespoons (10 g) instant coffee or espresso powder and 1/3 cup (65 g) granulated sugar. Add 2 tablespoons (30 mL) hot water and stir until the coffee and sugar are fully dissolved. Let cool to room temperature before adding to the whipped cream—otherwise, it could melt your peaks!
-
Whip the Cream:
In a large chilled mixing bowl, pour 1 cup (240 mL) heavy whipping cream. With an electric mixer or a strong whisk, beat the cream until soft peaks form—about 2-3 minutes on medium-high. You want it fluffy but not stiff; overwhipping can turn it buttery. (If you’re using coconut cream, whip until thick and pillowy.)
-
Add Flavor:
Pour the coffee-sugar mixture, 1 teaspoon (5 mL) pure vanilla extract, and the dissolved gelatin into the whipped cream. Use a spatula to gently fold everything together, being careful not to deflate the cream. The mousse should look smooth and light brown with no streaks.
-
Chill:
Spoon the mousse into dessert glasses or ramekins. Cover and refrigerate for at least 2 hours, or until set. If you’re impatient (like me), you’ll notice the mixture firming up in about an hour, but the texture gets silkier with more chilling time.
-
Serve:
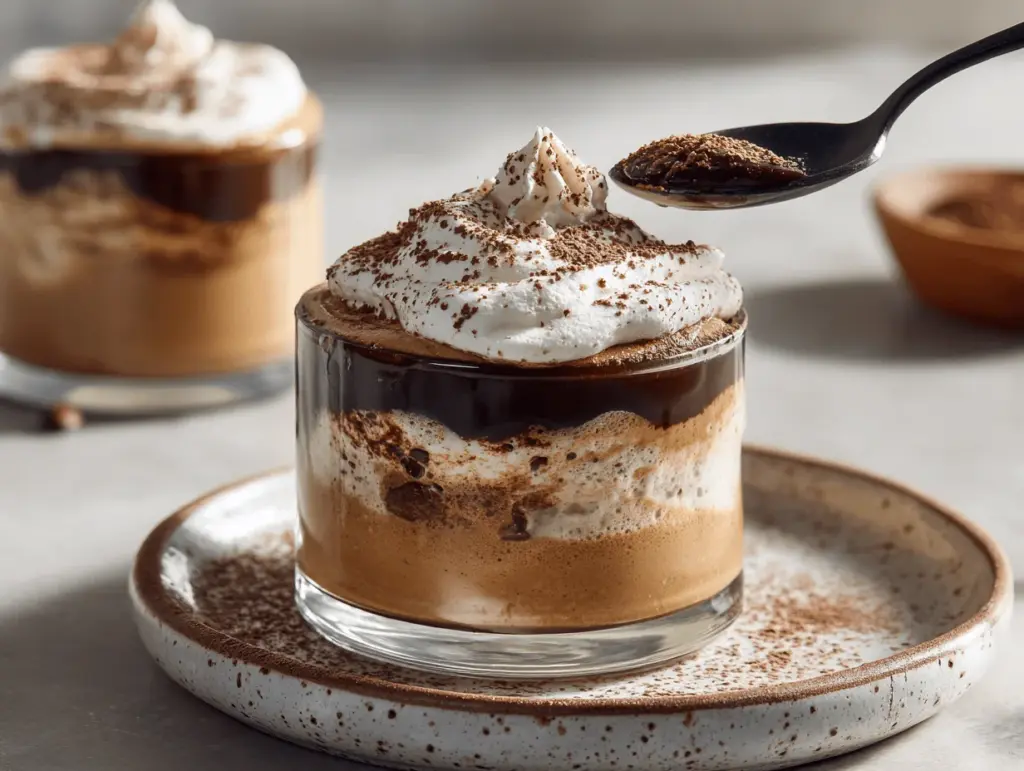
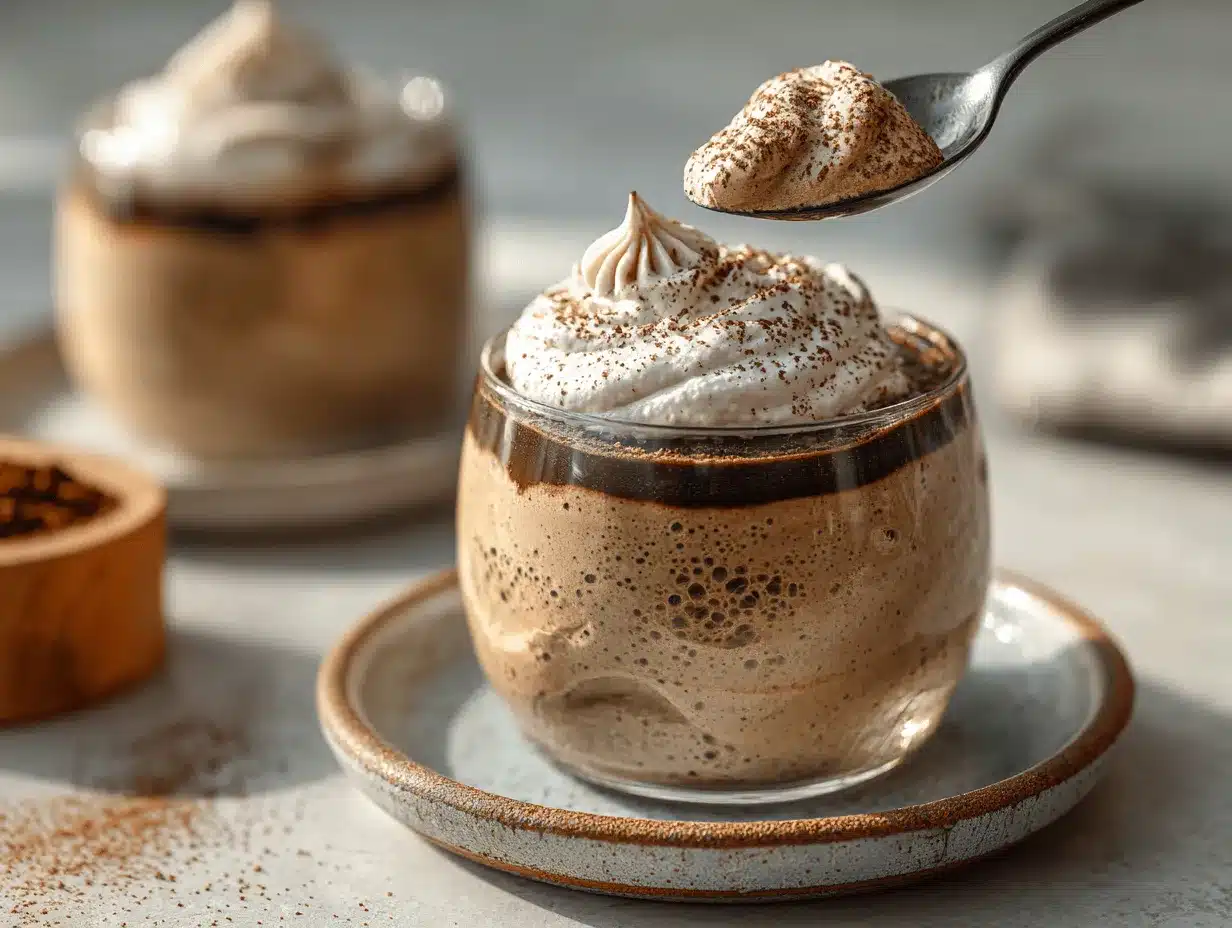
Top with a dusting of cocoa powder, shaved chocolate, or a dollop of extra whipped cream if you like. The mousse should be firm yet airy, with a delicate jiggle when you move the glass. Serve cold and enjoy!
Troubleshooting: If the mousse is too runny, it probably needs more chill time (or the gelatin didn’t dissolve properly). If it’s too firm, reduce the gelatin next time by 1/4 teaspoon. Always use a light hand when folding—this keeps your mousse fluffy and beautiful.
Cooking Tips & Techniques
Over the years, I’ve picked up a few tricks for making this coffee mousse recipe easy, consistent, and totally stress-free. Here are my best tips (learned from both triumphs and a few flops!):
- Chill Everything: Cold cream whips faster and holds more air. Pop your mixing bowl and beaters in the fridge for 10 minutes before starting. (I sometimes forget, but it really does make a difference.)
- Bloom the Gelatin Properly: Skipping the bloom or not letting the gelatin fully dissolve leads to weird, rubbery bits in your mousse. Always give it a good 5 minutes, and stir until clear before adding.
- Don’t Overwhip: Once your cream hits soft peaks, stop! Overbeaten cream can separate or make your mousse dense. If you go too far, just fold gently with a spatula to loosen it up again.
- Gently Fold: Folding is the name of the game—use a spatula and a light touch. Stirring too vigorously knocks out the air and deflates your mousse.
- Timing: Make the coffee mixture while the gelatin is blooming. That way, everything comes together quickly and nothing sits too long.
- Customization: Taste the coffee-sugar mixture before folding it in. If you want it sweeter or stronger, adjust before mixing with the cream.
I once tried to speed things up by not chilling the mousse long enough—big mistake. The flavor was still great, but the texture was more like a soft pudding. Patience pays off here!
And if you’re making a big batch, work in small batches for the best texture. Whipped cream can deflate if it sits too long while you’re prepping other ingredients. For consistent results, always measure and prep everything before you start.
Variations & Adaptations
One of my favorite things about this coffee mousse recipe with whipping cream is how easily it adapts to different tastes and dietary needs. Here are some playful spins you can try:
- Mocha Mousse: Add 2 tablespoons (15 g) unsweetened cocoa powder to the coffee mixture for a chocolate-coffee twist. Top with chocolate curls for extra flair—kids love this version.
- Dairy-Free & Vegan: Swap the heavy cream for full-fat coconut cream and use agar-agar powder instead of gelatin. The mousse will be a little denser but still dreamy (I’ve served this to vegan friends and they raved!).
- Spiced Coffee Mousse: Stir in a pinch of ground cinnamon, nutmeg, or cardamom for a cozy, chai-inspired flavor. This one’s perfect for autumn gatherings or holiday brunch.
You can also play with presentation—layer the mousse with crushed cookies or ladyfingers for a coffee “tiramisu” vibe, or pipe it into mini tart shells for a fancy finger-food dessert. If you’re avoiding refined sugar, use a natural sweetener like maple syrup (just reduce the liquid elsewhere to keep the texture right).
Personally, I love adding a splash of Irish cream liqueur to the coffee mixture when making this for adults—just one tablespoon transforms the flavor and makes it extra special. For an allergen-free version, double-check that your coffee and vanilla are gluten-free and skip any cookie garnishes if needed. There are so many ways to make this recipe your own!
Serving & Storage Suggestions
This coffee mousse is best served cold, straight from the fridge. I love presenting it in individual glasses or little jars with a swirl of whipped cream and a sprinkle of cocoa powder—so simple, but it looks like a café dessert. For a dinner party, layer the mousse with berries or crushed biscuits for extra texture and color.
If you’re pairing drinks, a shot of espresso or a glass of dessert wine is lovely alongside the mousse. It also plays nicely with biscotti or almond cookies for dipping.
To store, cover each serving tightly with plastic wrap or a fitted lid and refrigerate for up to 3 days. The texture actually improves after a few hours as the flavors meld. Avoid freezing—whipped cream doesn’t thaw well and can turn grainy. If you want to make ahead, prep the mousse a day in advance and garnish just before serving for the freshest look.
Leftovers (if you have any!) make an amazing topping for pancakes or waffles the next morning. Just give it a quick stir to fluff it up again. The coffee flavor mellows out a bit after chilling, so it’s even tastier the next day.
Nutritional Information & Benefits
Here’s an approximate breakdown for one serving (based on four servings total):
- Calories: 240
- Fat: 19g (mostly from the cream)
- Carbohydrates: 16g
- Protein: 3g
- Sugar: 13g
The main nutritional highlight here is the healthy fat from the whipping cream, which helps you feel satisfied with a smaller portion. Coffee provides a gentle caffeine boost and is rich in antioxidants. If you use coconut cream and a low-calorie sweetener, you can make this mousse keto-friendly or dairy-free.
Keep an eye out for allergens—this recipe contains dairy and gelatin (or agar), plus coffee (caffeine). If you’re sensitive to any of these, see the Variations section above for easy swaps. For me, treats like this are about balance—a little indulgence, a lot of joy, and totally worth it!
Conclusion
If you’re looking for a coffee mousse recipe easy enough for any night but impressive enough for special occasions, this is it. There’s something so satisfying about whipping up a dessert with just five ingredients and watching everyone’s faces light up at the first bite. I love how this recipe lets you play with flavors and textures, and honestly, it never disappoints—no matter how many times I make it.
Whether you’re serving it at a fancy brunch, making it ahead for a busy week, or just treating yourself after a long day, this coffee mousse with whipping cream always feels like a little act of self-care. My advice? Don’t be afraid to tweak it to make it your own—add chocolate, swap the cream, or sneak in a splash of liqueur. You’ll find your favorite version soon enough!
Give it a try, and let me know how it turns out—leave a comment, share your creative twists, or tag me if you post it online! Here’s to easy, irresistible desserts that make every day a little sweeter.
FAQs
Can I make this coffee mousse recipe ahead of time?
Yes, you can! It actually tastes even better after a few hours in the fridge. Just keep it covered and garnish right before serving for best results.
What if I don’t have instant coffee or espresso powder?
You can use very strong brewed coffee—just reduce other liquids slightly so your mousse isn’t too runny. The flavor will be a bit milder but still delicious.
Can I make this mousse without gelatin?
Absolutely! Use agar-agar powder for a vegetarian version (about half the amount of gelatin). Make sure to dissolve it fully in hot water for best texture.
How can I make this dessert sugar-free?
Swap the granulated sugar for a powdered sugar substitute like erythritol or monk fruit. Taste as you go since sugar alternatives can be sweeter than regular sugar.
Can I freeze coffee mousse for later?
I don’t recommend freezing—whipped cream doesn’t hold up well after thawing. For best texture, stick to refrigerating and enjoy within three days.
Pin This Recipe!

Coffee Mousse Recipe Easy 5 Ingredient Dessert with Whipping Cream
- Total Time: 2 hours 20 minutes
- Yield: 4 servings 1x
Description
This silky, cloud-like coffee mousse is a quick and elegant dessert made with just five ingredients. It delivers bold coffee flavor and a creamy, airy texture—perfect for any occasion and easy enough for weeknights.
Ingredients
- 1 cup heavy whipping cream
- 2 tablespoons instant coffee or espresso powder
- 1/3 cup granulated sugar
- 1 teaspoon gelatin powder (or 1/2 teaspoon agar-agar powder for vegetarian)
- 1 teaspoon pure vanilla extract
- 2 tablespoons cold water (for blooming gelatin)
- 2 tablespoons hot water (for dissolving coffee and sugar)
Instructions
- In a small bowl, sprinkle 1 teaspoon gelatin powder over 2 tablespoons cold water. Let sit for 5 minutes to bloom. (If using agar-agar, use 1/2 teaspoon and bloom in hot water.)
- Heat the bloomed gelatin in the microwave for about 10 seconds or in a small saucepan over low heat until dissolved and clear. Do not boil. Set aside to cool slightly.
- In another small bowl, mix 2 tablespoons instant coffee or espresso powder and 1/3 cup granulated sugar. Add 2 tablespoons hot water and stir until dissolved. Let cool to room temperature.
- In a large chilled mixing bowl, whip 1 cup heavy whipping cream with an electric mixer until soft peaks form (about 2-3 minutes).
- Gently fold the coffee-sugar mixture, 1 teaspoon vanilla extract, and the dissolved gelatin into the whipped cream using a spatula. Mix until smooth and light brown.
- Spoon the mousse into dessert glasses or ramekins. Cover and refrigerate for at least 2 hours, or until set.
- Serve cold, optionally topped with cocoa powder, shaved chocolate, or extra whipped cream.
Notes
Chill your mixing bowl and beaters for best results. For a vegetarian version, use agar-agar powder instead of gelatin. Adjust coffee and sugar to taste. Do not overwhip the cream. The mousse sets best after at least 2 hours in the fridge. Can be made a day ahead.
- Prep Time: 15 minutes
- Cook Time: 5 minutes
- Category: Dessert
- Cuisine: American
Nutrition
- Serving Size: 1/4 of recipe (about 1/2 cup per serving)
- Calories: 240
- Sugar: 13
- Sodium: 25
- Fat: 19
- Saturated Fat: 12
- Carbohydrates: 16
- Protein: 3
Keywords: coffee mousse, easy dessert, 5 ingredient dessert, no bake, whipped cream, mousse recipe, coffee dessert, gluten free, high protein dessert